
Blowfish – Free Fish Crochet Pattern

Written by Freddy Goat Design Team
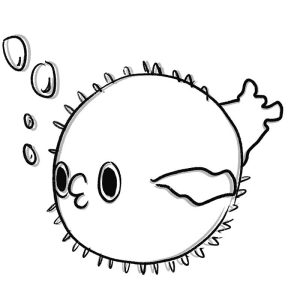
crochet fish pattern free
No luck keeping your pet fish alive? No sweat, the cutie you make from this free crochet fish pattern will never need to be flushed down the toilet. Actually, we recommend you don’t, even if you aren’t happy with the results.
SPECIAL STS/INSTRUCTIONS
Bobble: All the bobbles in this free crochet fish pattern are 4-step bobbles. Making a bobble is similar to making multiple dcs in the same stitch, except that you keep a loop of yarn on your hook rather than finishing each stitch.


Before we get started, this is what you need:
- 2.75mm(US C-2) crochet hook
- Aran or worsted weight yarn:
• Color A: Primary body color
• Color B: Edge of fins
• Color C: Outer eye
• Color D: Inner eye
• Color E: Cheeks - Tapestry needle
- Stuffing
5-rnd gauge circle = 1.75”/4.5cm Gauge isn’t terribly important in amigurumi, so it is okay to use a slightly larger hook if that is all you have. However, you don’t want to see stuffing through the stitches, so don’t get too big.

- Magic ring (MR)
- Single crochet (sc)
- Increase (inc)
- Invisible decrease (invdec)
- Double crochet (dc)
- Bobble (4-bob and 5-bob)
- Invisible join
Download here our free Terms and Techniques glossary for more information.
Or check out Crochet 101 for tips on how to do these and other stitches!

©2021 Freddy Goat. FREDDY GOAT ALL RIGHTS RESERVED. No part of this free crochet fish pattern may be published, resold, reproduced (in any form or by and means, electronic or mechanical, by photocopying, recording or otherwise), shared, translated or altered without prior permission in writing from the author.
If you sell or exhibit items made using this pattern, credit Freddy Goat Patterns and Design as the original designer. Also, pleases give us a tag on social media so we can see your beautiful work.
Free crochet fish pattern instructions:
BODY
• Worked in the round in Color A.
• On bobble rounds 4-bob indicates you should make a 4 step bobble, and 5-bob indicates a 5 step bobble.
• In the first round you will form a puckered lips by making two 5-bob.
Rnd 1: MR, 5-bob, sc 2, 5-bob, sc 2. [6 sts]
Rnd 2: Inc x 6. [12 sts]
Rnd 3: *Inc, sc* x 6. [18 sts]
Rnd 4: *Sc, inc, sc* x 6. [24 sts]
Rnd 5: *Sc 3, inc* x 6. [30 sts]
Rnd 6: *Sc 2, inc, sc 2* x 6. [36 st]
Rnd 7: *Inc, sc 5* x 6. [42 sts]
Rnd 8: *Sc 3, inc, sc 3* x 6. [48 sts]
Rnd 9: *4-bob, sc 3* x 12. [48 st]
Rnd 10: *Sc 15, inc* x 3. [51 sts]
Rnd 11: *Sc 8, inc, sc 8* x 3. [54 sts]
Rnd 12: *5-bob, sc 3, 5-bob, sc 4* x 6. [54 sts]
Rnd 13 – Rnd 14: Sc 54.
Rnd 15: *5-bob, sc 3, 5-bob, sc 4* x 6. [54 sts]
Rnd 16: *Sc 8, invdec, sc 8* x 3. [51 sts]
Rnd 17: *Sc 15, invdec* x 3. [48 sts]
Rnd 18: *4-bob, sc 3* x 12. [48 sts]
Rnd 19: *Sc 3, invdec, sc 3* x 6. [42 sts]
Rnd 20: *Invdec, sc 5* x 6. [36 sts]
Rnd 21: *4-bob, sc 2* x 12. [36 sts]
Rnd 22: *Sc 2, invdec, sc 2* x 6. [30 sts]
Rnd 23: Sc 30. Begin stuffing the body
firmly using small bits of stuffing at a time.
Rnd 24: *Sc 3, invdec* x 6. [24 sts]
Rnd 25: Invdec x 12. [12 sts]
Break the yarn, thread the yarn tail through the front loops of the remaining 12 stitches, add additional stuffing, and pull the tail to draw the opening closed.
*Don’t worry if the lips don’t line up exactly as you are making the bobbles.
They will align when you pull the tail of the magic ring tight.
TAIL
• The tail begins with a chain, but you will join as a ring and continue working in the round.
• Begin in Color A.
• Leave a long tail at the beginning of your chain that you will use to sew the tail to the body.
• After Rnd 7, flatten the work and begin working in rows.
Rnd 1: Ch 30, then sc into the first ch to
form a ring. Sc 29 in remaining chs. [30 sts]
Rnd 2: Sc 15, *invdec, sc 3* x 3. [27 sts]
Rnd 3: Sc 15, *Sc, invdec, sc* x 3. [24 sts]
Rnd 4: Sc 15, *sc, invdec* x 3. [21 sts]
Rnd 5: Sc 21.
Rnd 6: *Invdec, sc 3* x 3, invdec x 3. [15 sts]
Rnd 7: Sc 15.
Rnd/Row 8: Sc 3, then flatten the work
so the active stitches are lined up. Now sc 7
through both layers of stitches.
Row 9: Change to Color B, ch 2, dc 4 in the same stitch, sk 1, sl st, dc 4 in next st, sk 1, sl st, dc 4 in final st, ch 2, then break the
yarn and join the weave in the tail, working through the base of the final st first.
Pin the tail to the body so that the 30 sts of Rnd 1 of the tail align with the 30 sts of
Rnd 23 of the body. Begin sewing the tail to the body and pause to stuff before sealing completely.
FINS
• Worked in the round until Rnd 5, when you will flatten the work and begin working in rows.
• Begin in Color A.
Rnd 1: MR, sc 6.
Rnd 2: Inc x 6. [12 sts]
Rnd 3: *Inc, sc* x 6. [18 sts]
Rnd 4: *Sc 5, inc* x 3. [21 sts]
Rnd 5: Change to Color B, flatten the work, ch 1, then Sc 10 through both layers, ignoring the first st; turn, ch 1. [10 st]
Rnd 6: Sk 2, 6-dc in next, sk 1, sl st 2, sk 1, 6-dc in next, sk 2. Break the yarn and join the final st. Weave in the tail
CHEEKS
• Worked in the round in Color E.
Rnd 1: MR, sc 6, sl st in the first st of the rnd, break the yarn leaving a tail, and
invisible join.
OUTER EYE (2)
• Worked in the round in Color C.
Rnd 1: MR, sc 7.
Rnd 2: Inc x 7; sl st in the first st of the rnd, break yarn leaving a tail, and invisible join.
IRIS (2)
• Worked in the round in Color D.
Rnd 1: MR, sc 7; sl st in first st, break the yarn, and invisible join.
Sew the iris to the center of the outer eye, then sew the cheeks and eyes to the body on either side of the puckered mouth, overlapping the eyes over the cheeks slightly.


Thank you so much for making Blowfish! We hope you love your ami and enjoyed the pattern. We would totally love to see the finished product. Please post a pic and tag us in your social when you have a chance. Also, drop a comment below or send us an email if you have any questions or feedback on the patterns.
P.S. No Blowfish were harmed in the making of this free crochet fish pattern.
Thanks a million!!!! Lots of love and silliness<3
Written by Freddy Goat Design Team
Related Articles
Been – a simple crochet bee pattern
BEEN (that total unit of a crochet bee) Nearly three years ago we decided to do a series of simple, bean shaped patterns for begining crocheters, only to discover that "simple and bean shaped" isn't a lot of fun to design. The results? One charming Been, the...
Yarn Color Combinations – The Value of Color.
Hi All! Welcome back and happy New Year! Today I want to continue with our beginner’s guide on how to choose yarn color combinations. If you are wondering how to do that, this is the place for you. In each article, I try to explain a little about Color Theory so you...
Week 2: Trying Out Crochet Triangles
Wow! This was an incredibly difficult post to get started on! To be perfectly honest, I almost never use triangles in amigurumi creation, so I didn’t have much insight to impart when I sat down to write this. Then I realized that might be a blind-spot worth exploring....
0 Comments