Week 2: Useful Crochet Techniques

Written by Freddy
Hello! So glad to see you again. By now you have had several weeks to try out all the basic stitches we covered in our last blogpost (ch, sl st, sc, hdc, dc, tr) and are hopefully feeling pretty good about your hook control, tension, and ability to make the stitches. Congrats to you! You are well on your way to becoming an amigurumi maker! (And, if you are not quite there yet, keep at it! It takes time to develop the muscle memory, but once you have it you will feel like a total bad a$$ and your friends will oooh and ahhhh!)
You are ready to move onto the next set of useful tools for your crochet/ami-making toolbox. Most of these are techniques rather than stitches, although a couple (increases and decreases) are modifications to stitches that aid in shaping.
Let’s get started!
It takes time to develop the muscle memory, but once you have it you will feel like a total bad a$$ and your friends will oooh and ahhhh!”
WARNING: The Magic Ring can be aggressive when threatened!
If the Magic Ring is new to you, you might not like the learning process. The Magic Ring itself is not truly that complicated, but it can be a real brain-bender trying to learn, in part because watching someone else do it, then figuring out how to mirror it in your head is just, well, blarggghghghgh! Most people get it after a few attempts and then forget it again, then have to relearn it, and so on until it finally clicks. However, if it is truly not your thing, there are work arounds. Some folks simply make a chain 2 then work into the first chain they made as though it were a ring. Others, like Garnknuten, do some magic thing I can’t even begin to understand, but looks cool as hell. Give it the old college try, but don’t beat yourself up if it takes some time (or if you decide to use another method!). You’re in the trust tree and we won’t judge😂
Useful Crochet Techniques
You can also download our Terms and Techniques pdf for one the go use!
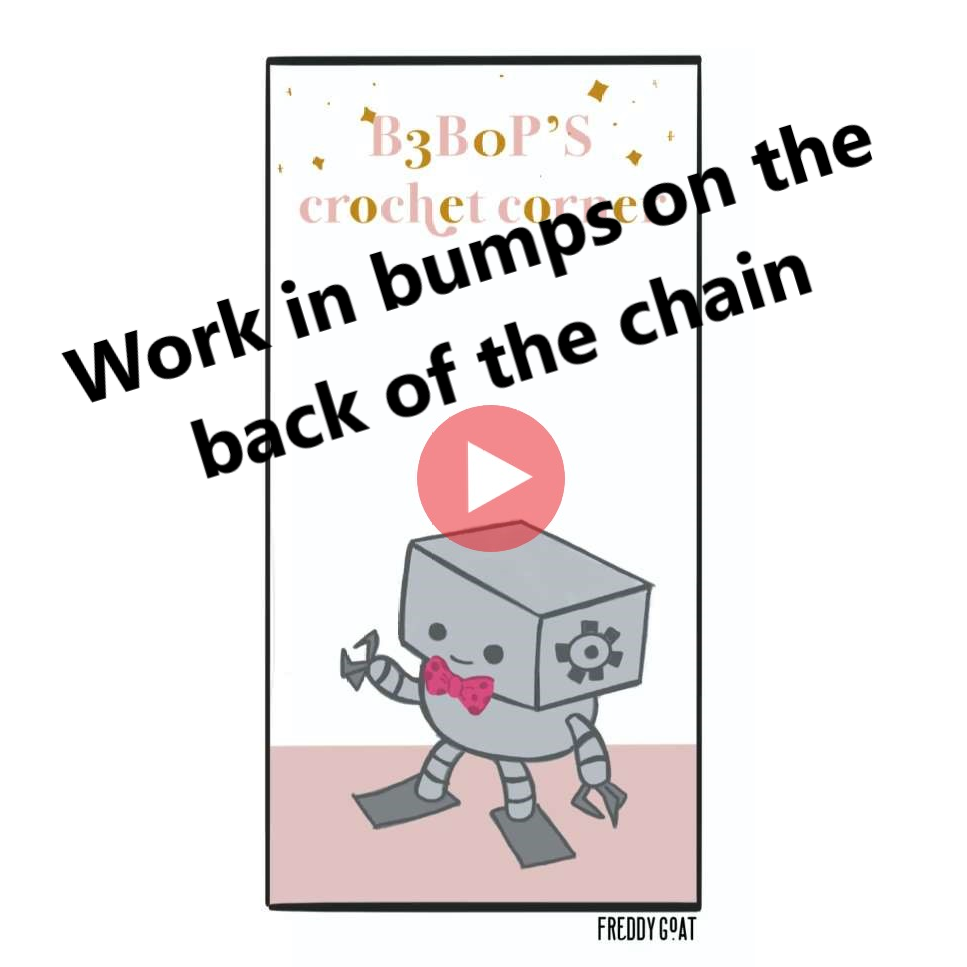
Working into the bumps on the back of the chain
We LOVE this technique and use it frequently, because it leaves you with active stitches on both side of the foundation chain. It is great when working in rows AND for starting ovular rounds. In our patterns, unless otherwise stated, you are always welcome to work into the back bumps of the foundation chain.
Instructions:
Note: If you are not working single crochets into the foundation chain you may need to add extra stitches for the turning chain. See our post on the basic crochet stitches.
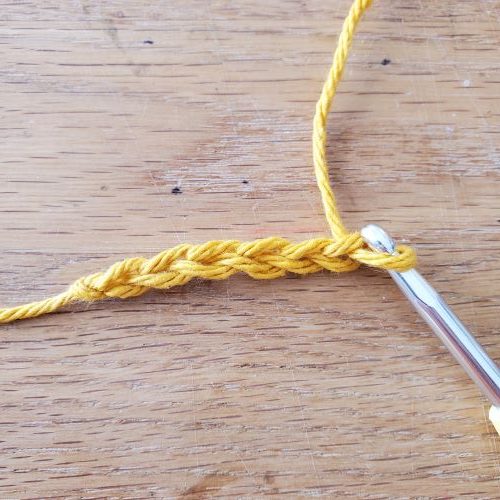
Make as many chains as the desired number of stitches plus 1 additional chain.
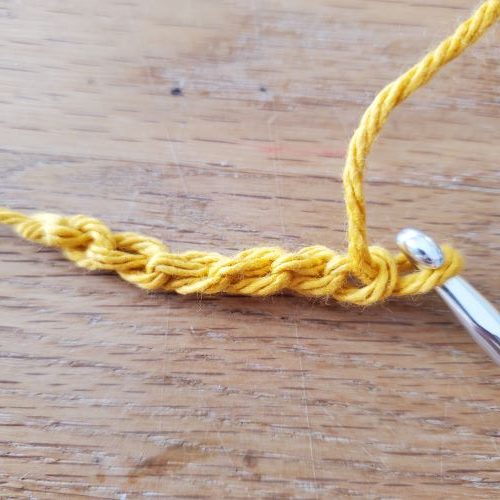
Flip the chain over and identify the bumps on the back of the chains.
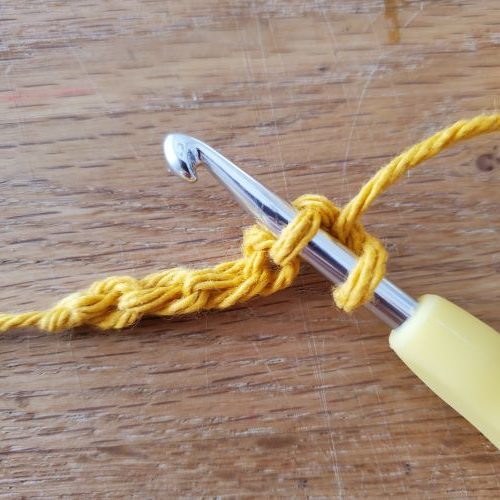
Insert your hook into the bump on the back of the second chain from the hook and make the stitch as usual.
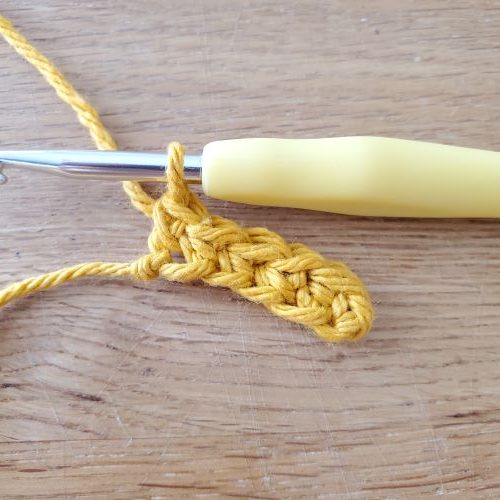
Continue in the same way across the length of the chain.
Magic Ring, Magic Loop
MR
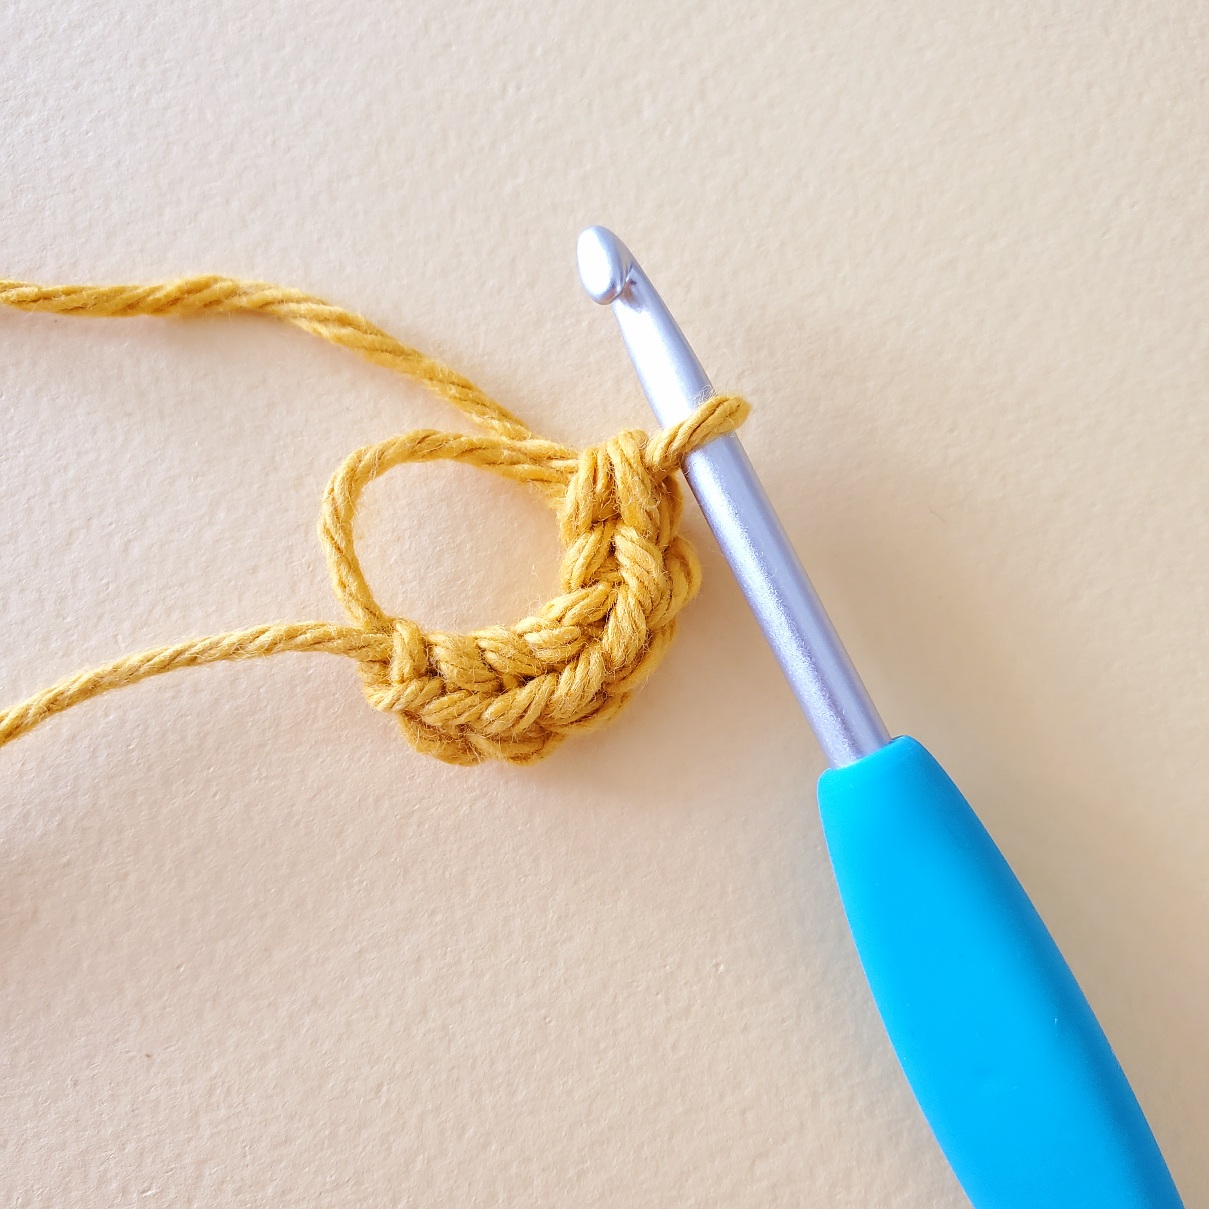
Ahhh the dreaded Magic Ring! Has any crochet technique created more anxiety and confusion?!? Rest assured, as with most things, it looks far more complicated than it really is. You WILL need to practice the maneuver many times before you have it committed to muscle memory, but when it is finally in your noggin it will never leave you.
For your information, the method we use is just one of many ways to achieve the same result. If you have trouble with our instructions or video, there are many many youtube resources out there to help you. Don’t worry—you got this!!!
Instructions:
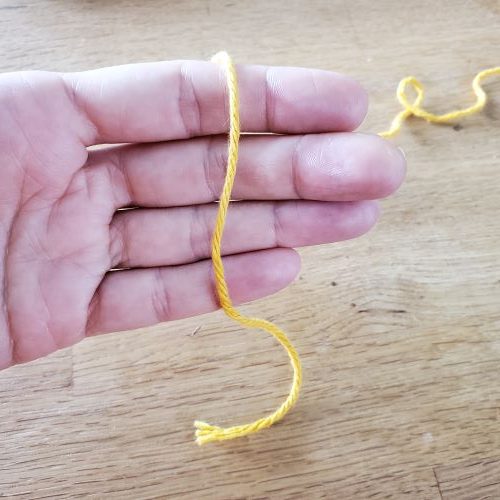
Drape the yarn over your non-dominant hand with the cut end of the yarn facing you.
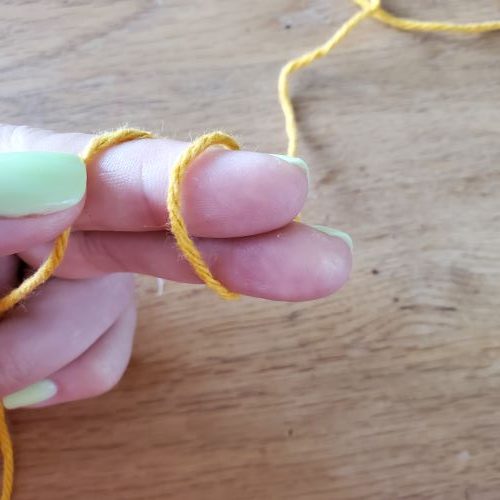
Grab the side of the yarn attached to the ball and wrap it under and around your first two fingers.
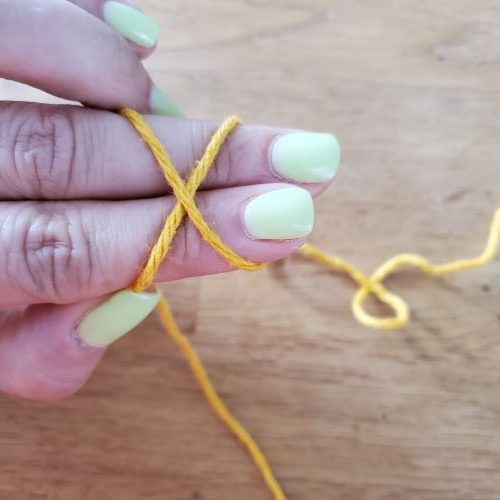
With the top of your fingers facing you, make an “X” with the yarn you just wrapped around.
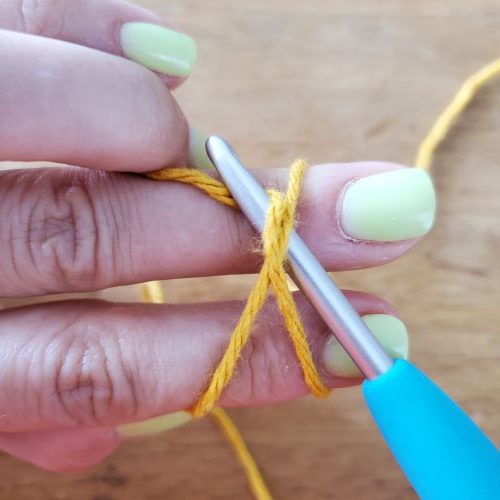
Insert your hook beneath the X and grab the back left leg of the X and pull it under and through (this will be the back right leg of the X for lefties).
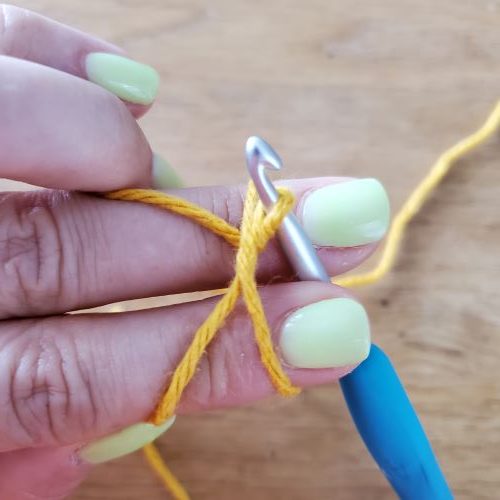
You now have one loop around your hook.
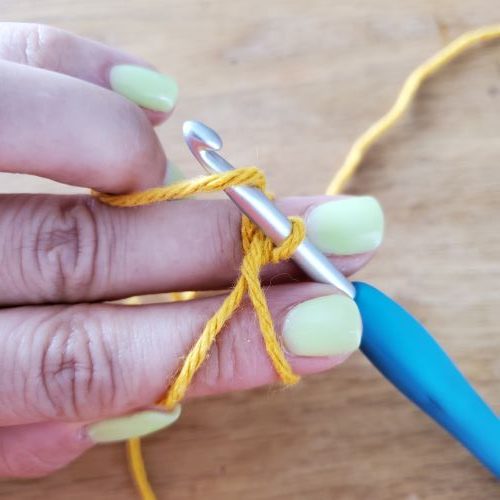
Yarn over the hook with the same leg of the X once more and pull it through the loop on your hook.
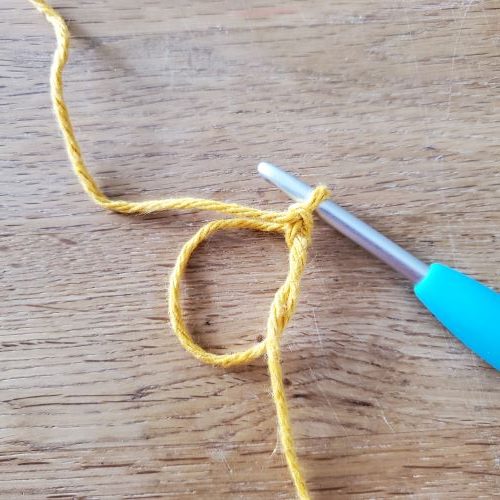
Your magic loop is now complete and you can work into it.
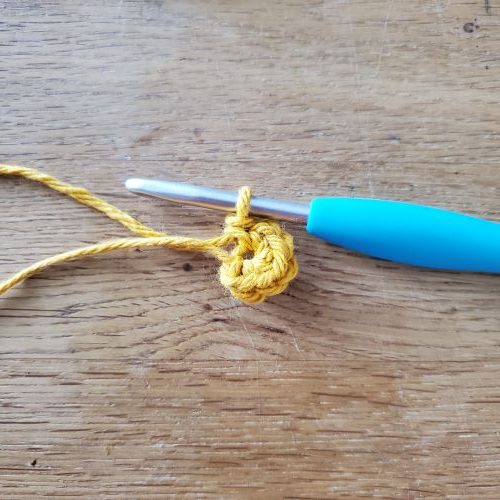
Treat the ring as a stitch and complete any stitches into it as you normally would. When you are done, use the starting tail to pull the ring closed.
Work into Front Loops Only
FLO, flo, or fl
Working into the front loops only can be very useful in amigurumi for a variety of reasons, as leaves a round of unused back loops that you can use later on. (For example, this can be very use when you are making an ami with clothing or multiple layers of work.) You can also use this technique to create textural variations within your work and to create more obvious creases when shaping. (We will write more on this later!)
Look at the top of your stitches from the round you just completed. Identify the ‘v’ at the top of each stitch and insert your hook beneath the nearest leg of the v only, then work the stitch as usual.
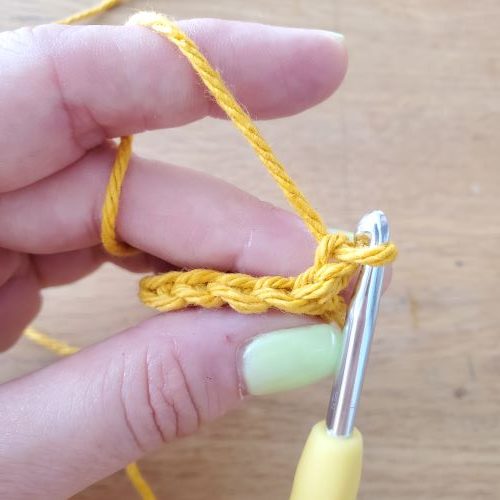
Look at the top of the stitches in the previous row/round and identify the “V” on to p of the next stitch.
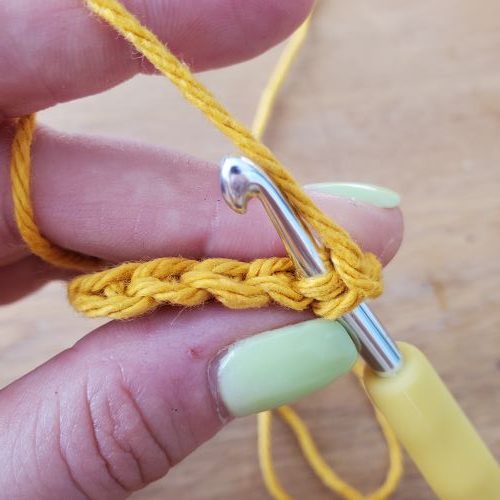
Insert the hook under the front leg of the V only and complete the stitch as usual.
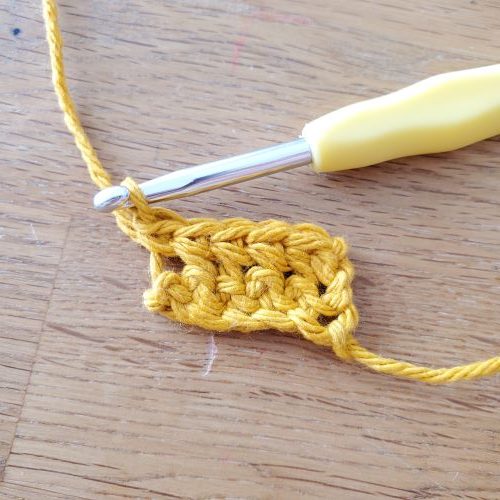
The front of the work looks the same as usual, although you might notice a slight tendency to bend towards you.
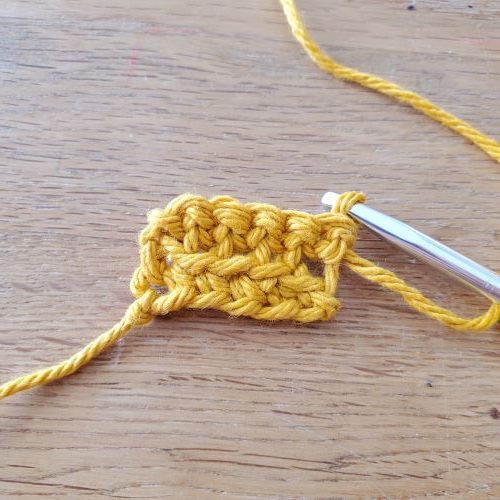
There is a row/round of unused back loops on the back of the work.
Work into Back Loops Only
BLO, blo, bl
This technique has all the same usefulness as working in FLO but in reverse, as it leaves an unused row/round of front loops on the front of your work.
Instructions:

Look at the top of the stitches in the previous row/round and identify the “V” on to p of the next stitch.
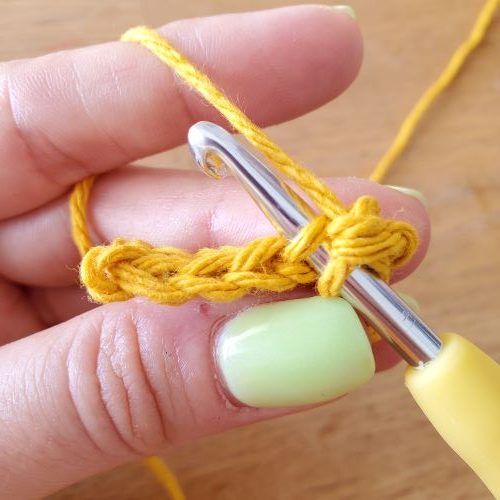
Insert the hook under the back leg of the V only and complete the stitch as usual.
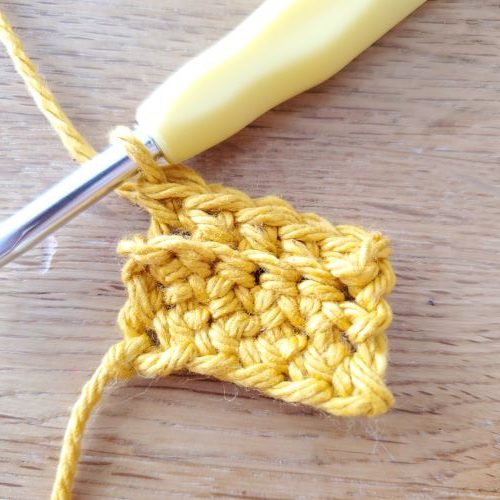
There is a row/round of unused front loops on the front of the work.
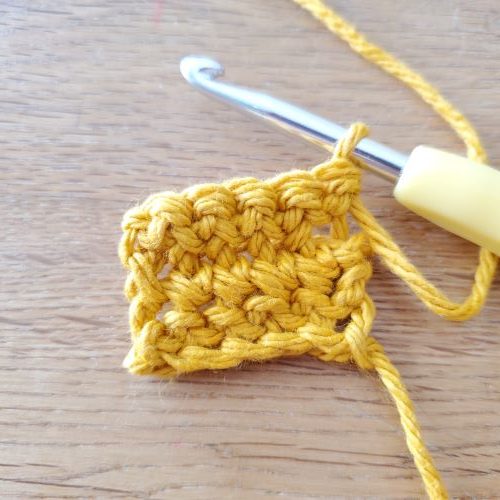
The back of the work looks like it usually does, though you might notice a slight tendency to fold towards the back.
Increase/ single crochet increase
inc
(Sometimes written as 2sc in next st or sc2 in next st)
The single crochet increase is the most common increase used in amigurumi crochet. It is quite simple and blends in well with the surrounding stitches. This technique is the prime tool in your toolbox for shaping.
Instructions:
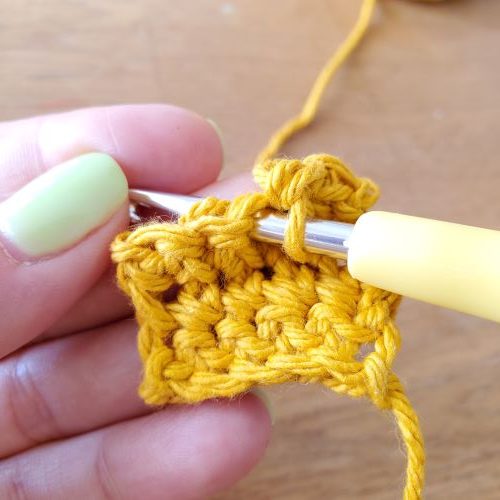
Make a single crochet in the next stitch.
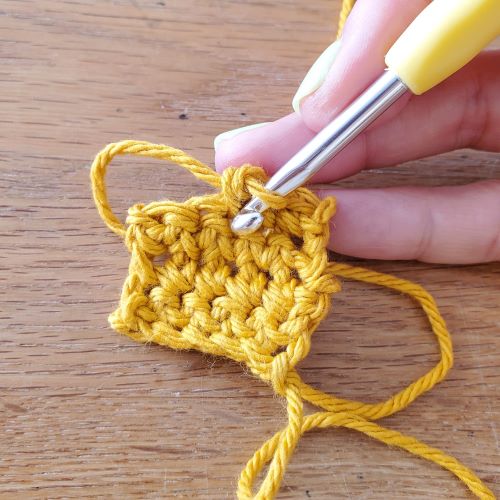
Insert your hook back into the same stitch, then make a second single crochet.
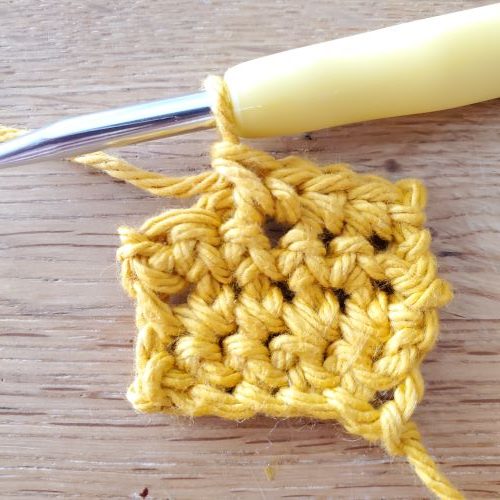
You have made one single crochet increase.
Invisible decrease
invdec*, inv dec, dec**
*There is no universal notation, but this one is fairly common
**Some designers prefer to use “dec” to represent all decreases
We use invisible decreases frequently because they create a less noticeable decrease in your fabric. However, many designers don’t use this type of decrease regularly.
Instructions:
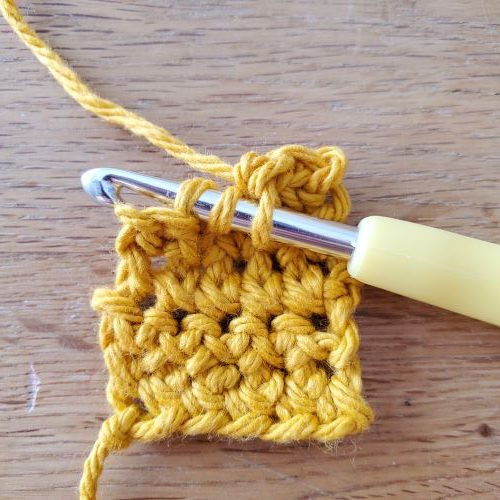
Insert your hook through the front loops only of the next two stitches.
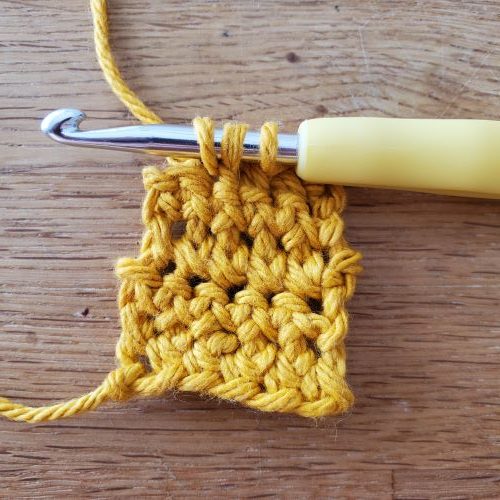
Yarn over and pull through the first loop on the hook. You now have three loops on your hook.
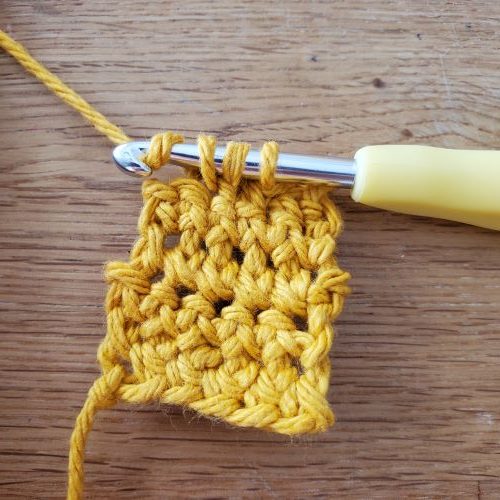
Yarn over and pull through the remaining three loops on the hook.
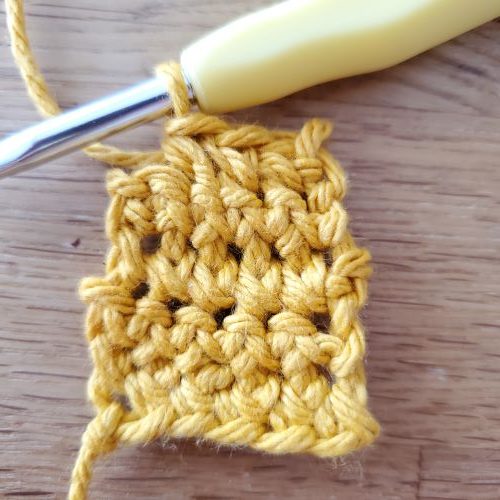
You have made one invisible decrease.
Decrease
dec
The standard decrease can create a small bump in your work, but can be very useful when you are working in BLO, you are working over a color change, or you are working in very tights rounds and invisible decreases are physically hard to make.
Note: You can also make this decrease in FLO (similar to an inv dec but with more yarn overs).
Instructions:
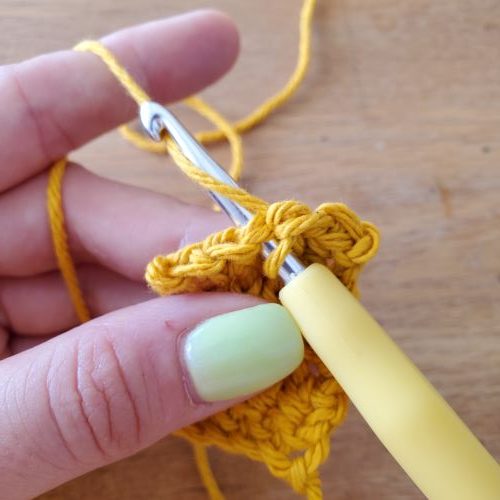
Insert your hook into the stitch, yarn over, and pull through the stitch.
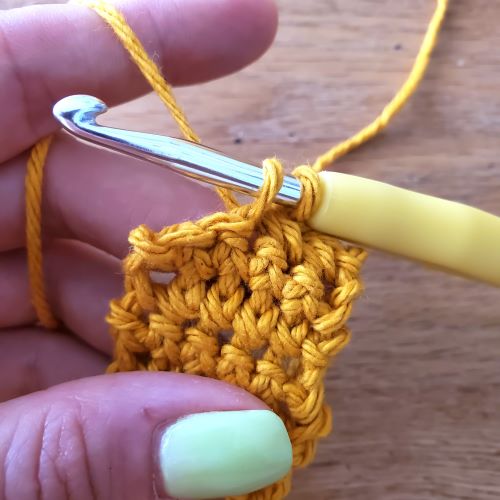
You now have two loops on your hook.
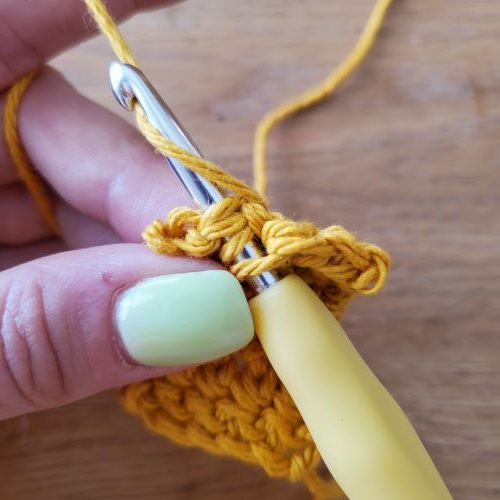
Insert your hook into the following stitch, yarn over, and pull through the stitch.
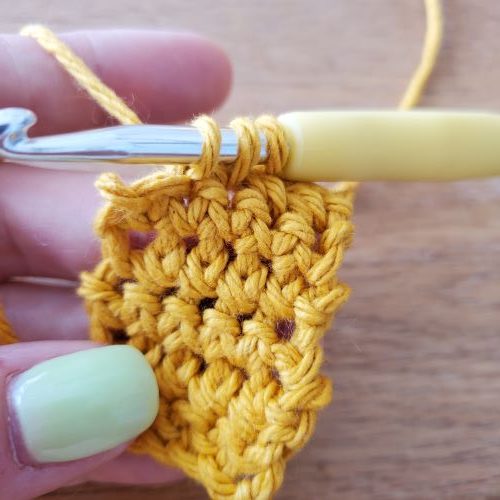
Now you have three loops on your hook.
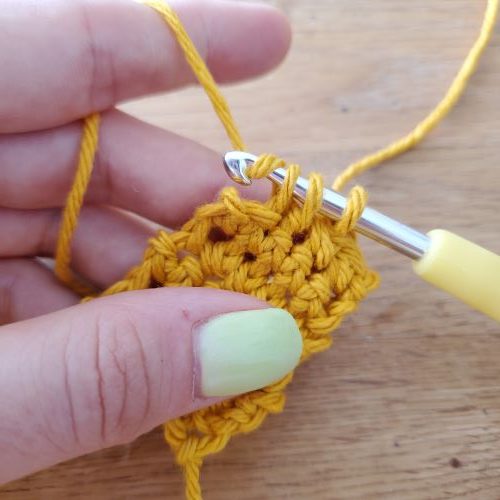
Yarn over and pull through all three loops on your hook.
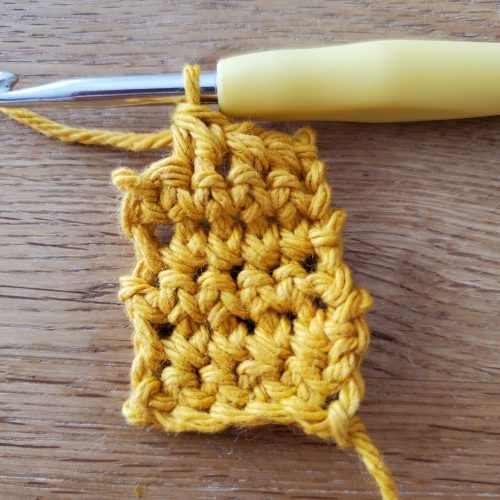
You have made one decrease.
Change Colors
We will certainly have more to say about color changes in future posts, but for now, know that this simple technique will stand you in good stead. It is quick and simple and can add zazz to your amis by opening you up to the world of color work.
Instructions:
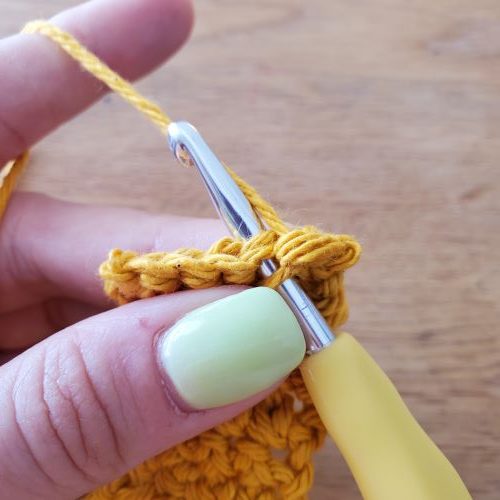
Insert your hook in the next stitch.
Yarn over in the original color, then draw through.
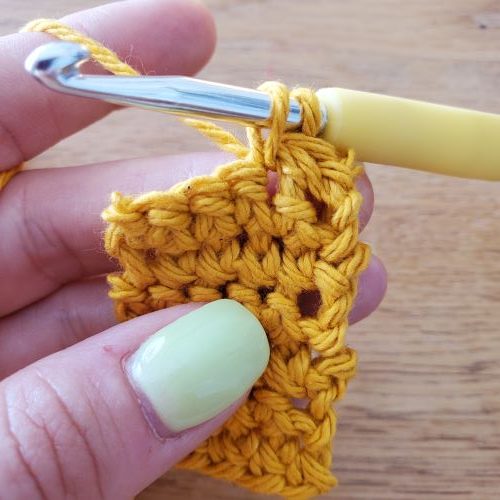
You now have two loops of the original color on your hook.
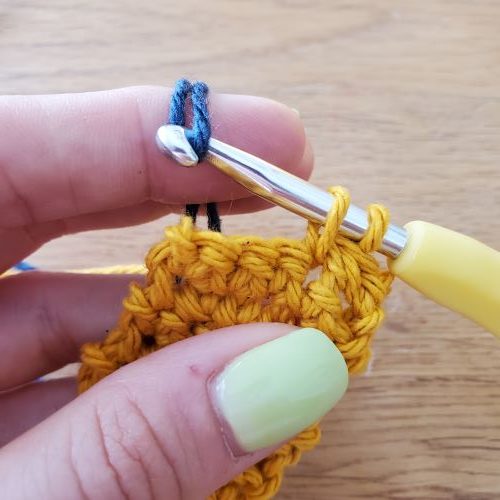
Yarn over in the new color and pull through both loops on the hook.
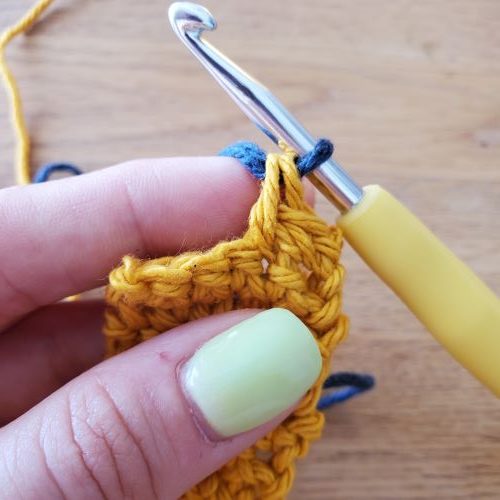
Voila! You now have a new color on your hook.
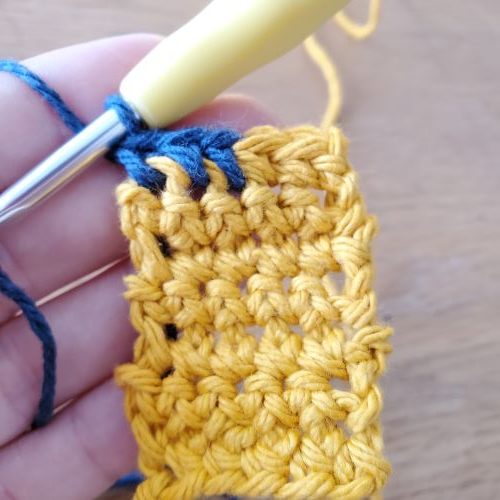
Now continue you working in your new color!
Invisible join
We recently saw an insta post about how overrated this technique is, but, personally, I disagree. I think it is especially useful for disguising the fasten off when working rounds (as we almost always do). However, if this just isn’t your thing, no big deal! In our patterns the invisible join is almost always a stylistic choice, so feel free to skip it if that makes your life a little better.
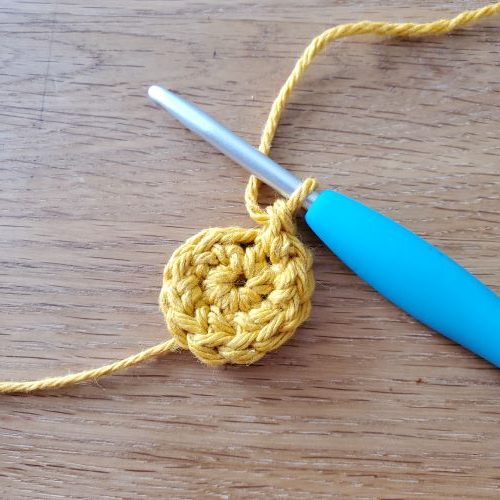
Make the last stitch required by the pattern instructions.
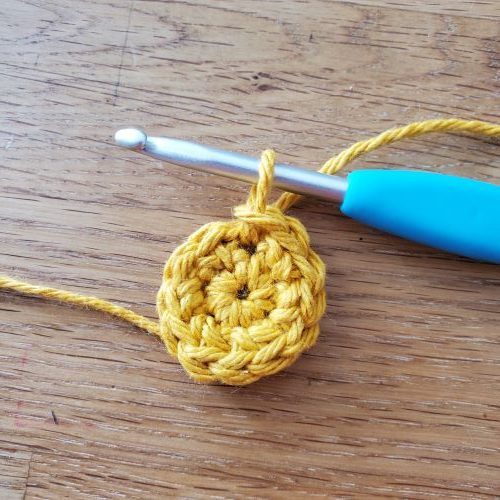
Make a slip stitch, then break the yarn and pull the tail through.
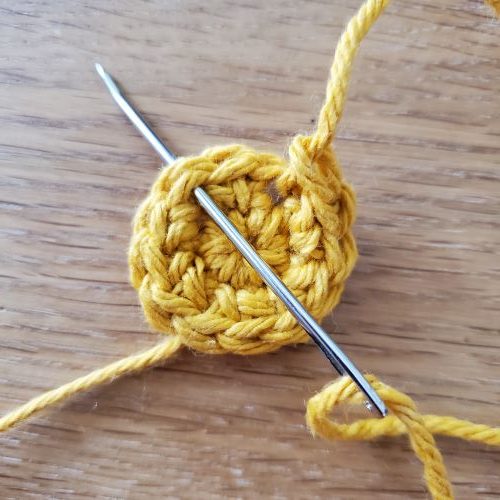
Thread the yarn on a tapestry needle. Skip the next stitch, then thread the yarn through the next stitch from the right side to the wrong side of the work. .
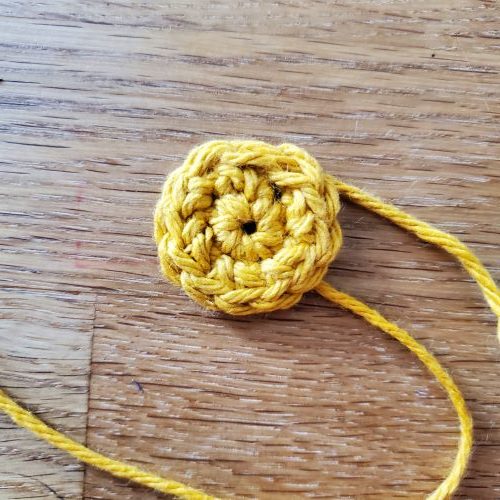
Finally, insert the needle back through the slip stitch and pull the yarn tail through towards the back of the work. Tighten gently.
If you are like us, you learn best through practical application. Never fear! You can find all of these techniques used in our free patterns, so pop on over and check them out.
We hope you enjoyed this installment. The next edition of Crochet 101 will probably cover a few ways to incorporate texture in crochet, but we would also love to hear from you. Let us know if there is a stitch or technique you would like us to explore!

Written by Freddy
Have a question about any of these stitches?!? Well…
Related Articles
Yarn Color Combinations – The Value of Color.
Hi All! Welcome back and happy New Year! Today I want to continue with our beginner’s guide on how to choose yarn color combinations. If you are wondering how to do that, this is the place for you. In each article, I try to explain a little about Color Theory so you...
Week 2: Trying Out Crochet Triangles
Wow! This was an incredibly difficult post to get started on! To be perfectly honest, I almost never use triangles in amigurumi creation, so I didn’t have much insight to impart when I sat down to write this. Then I realized that might be a blind-spot worth exploring....
Rainbow Color Palette for Yarn Work
USING ROYGBIV (& who said that's easy to pronounce?) Remember when we were kids and wanted everything in a rainbow color palette? Oh! Those simple days, when our queen Lisa Frank reigned over our notebooks, stickers, and pencil cases. Although I haven’t steered...




0 Comments